This is a continuation of our series on planning declarer play.
Take the south seat in today’s deal from a match-point event that had fifteen tables. Twelve N-S pairs reached 6S and made exactly twelve tricks. The remaining three, however, bid the optimistic grand, and all of them failed to make the contract. See whether you can find the play for the thirteenth trick.

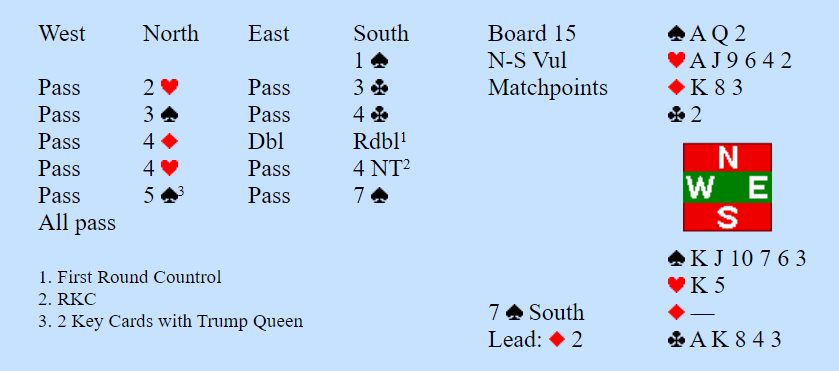
The Bidding :
The 2♥ response by North, which was a two over one, was game-forcing. Subsequently, he made a good bid of 3♠ to elicit more information from South. The final contract looks excellent and the sequence that the N-S pair produced at your table is absolutely fantastic.
Against your contract of 7♠, West leads the ♦2. Plan the play
How the play went
Ruffing the opening lead, declarer cashed ♣A, and ruffed a club with the ♠2, RHO following with the queen. Entering hand by ruffing another diamond, declarer ruffed the third club with the ♠A on which east discarded a heart. A third diamond was ruffed in hand and declarer ruffed the fourth club with the ♠Q.
When declarer now played a heart from dummy towards his king, east ruffed to defeat the contract.
What could he have done to save the contract?
Analysis
In accordance with what we have learnt we
- Count your winners
We can see 10 winners on top. - Count your losers
There are technically 3 losers in the declarers hand - If you are short of tricks, figure out where the rest of the tricks could come from
There can be 13 winners without any problems if we the balance clubs break 4-3. Even if they don't, as long as the spades don't break 4-0, we should be able to ruff out the losing clubs in dummy. - If you have no problem with the contract, consider what could go wrong
With 8 cards in hearts, there is a probability that they could break 4-1. If the hand which is short in clubs, is also short in hearts, we could face a problem
The Correct Play :
Armed with our analysis, we now know what to do. After ruffing the second club, we now enter our hand with the ♥K!
Now, when we ruff the 3rd club, no discard can hurt us. We then ruff a diamond, ruff out the fourth club, ruff the last diamond, draw trumps and claim in style
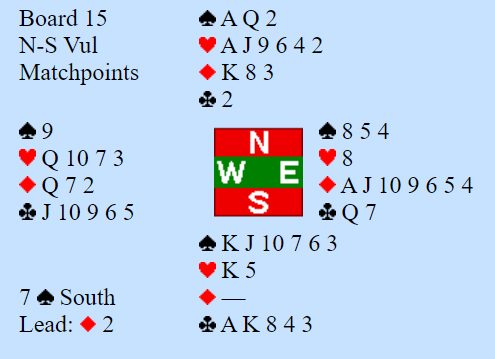
This was the full hand :

Did you play the hand right?
Do let us know in the comments section below!
Disclaimer : All opinions are entirely those of the author and are no reflection of the views of the BridgeFromHome Team.
Registration Links
| Tournament | Event | Deadline |
|---|---|---|
| |
